If you use Google Sheets to manage your content workflow, then getting your post and page data automatically sent from WordPress to Google Sheets via a webhook may be just what you’re looking for to take that workflow to the next level.
WordPress To Google Sheets Summary
We’re going to use two free solutions to get your WordPress data into Google Sheets.
The first one is an add-on that makes Sheets capable of receiving a webhook and the second is the Post Webhook for WordPress plugin, built by yours truly, that will send the data from WordPress to Google Sheets. Both are totally free and the process of setting it all up is surprisingly simple.
Step 1 – Install and setup the Webhook for Sheets Add-on
Google Sheets does not support webhooks by default, but fortunately, some kind soul has built an add-on that fixes this.
For this step, I’m simply going to say watch the video below which is from Sourabh Choraria the developer of the Sheets add-on we are going to use.
Just remember at the end of your setup process, make sure you copy the URL the script gives you as you are going to need it.
Step 2 – Install my Post Webhook Plugin
- Go to your WordPress site and log in to your Admin area
- Go to Plugins > Add new and search for my plugin, which is called Post Webhook (or directly from the WordPress Plugin Directory)
- Install the plugin and activate it
- Go to Settings > Post Webhook and enter the URL that you got from step 1 and click the Save Webhook URL button
- It is useful at this stage to publish a post or update a post, so that you have some data to play with (you can simply go to an existing post and add and then delete a space, just so you can select the Update button but not actually change your post)
To find out how the plugin works and what data it sends you can read my article – Post Webhook Plugin – How to Use
Step 3 – Watch in awe as your data magically appears in your Sheet
If you now go back to your Google Sheet and, assuming you have actually published, updated or deleted a post since setting this all up, you should see that by magic (well actually code, but magic sounds more impressive) you have data in your Sheet.

That is basically it (but do take note of step 4), now every time you publish, update or delete a previously published post/page on your WordPress site that data will be automatically sent to Sheets.
Step 4 – Dealing with Duplicates (optional step)
OK, I said that was basically it but you’ll probably want to do something about the default behavior of this process and that means dealing with duplicates.
Every time you trigger an event (publish, update, delete) that data gets sent to Google Sheets.
So if you publish a post and then later update that post, it will appear as two separate entries (two rows) in your Sheet.
This makes total sense as that’s what webhooks are meant to do, but it’s probably not what you want in your content workflow system i.e. the same post duplicated multiple times. So let’s deal with that.
To deal with duplicates, the most efficient, set-it-and-forget-it way, is to use some Google apps script and set it to run automatically.
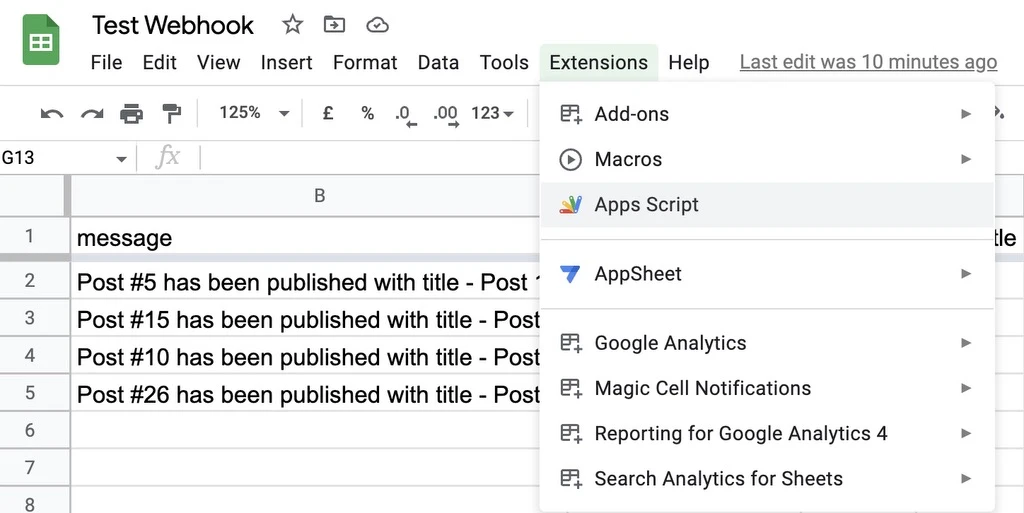
1. Go to Extensions > Apps Script in your menu bar (whilst in the sheet you have just created)

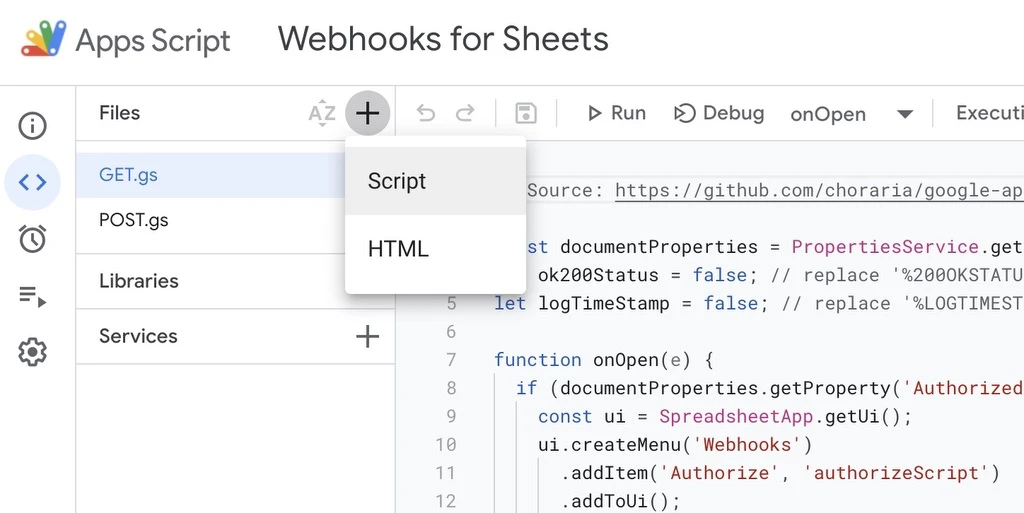
2. In the Files section, click the + symbol and select Script

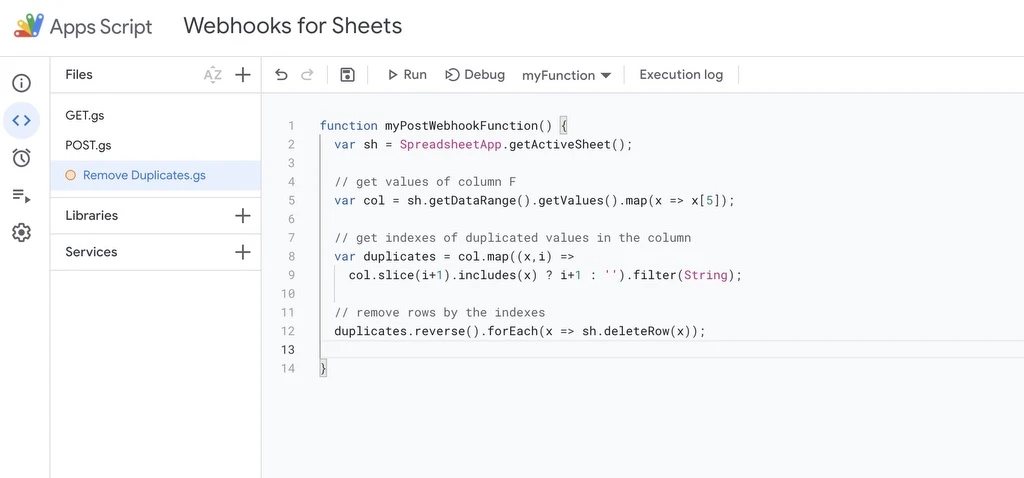
3. Name your new script (in my case Remove Duplicates) and paste the following code in. Make sure that there is no other code present on that screen as Google often pre-populates it with a starter function which we don’t want.
function myPostWebhookFunction() {
  var sh = SpreadsheetApp.getActiveSheet();

  // get values of column F
  var col = sh.getDataRange().getValues().map(x => x[5]);

  // get indexes of duplicated values in the column
  var duplicates = col.map((x,i) =>
    col.slice(i+1).includes(x) ? i+1 : '').filter(String);

  // remove rows by the indexes
  duplicates.reverse().forEach(x => sh.deleteRow(x));
}
Your screen should look like this when you’re done:

This code basically says, using Post GUID as the unique identifier (which is in Column F by default), delete any previous rows that contain the same Post GUID. Leaving you with the most recent event for that post/page.
If for whatever reason, Post GUID is not in column F in your setup then adjust the number in line 5 of the code accordingly map(x => x[5]), so if your Post GUID column is G you would change the code to map(x => x[6]) because G is the 6th column along (counting from 0).
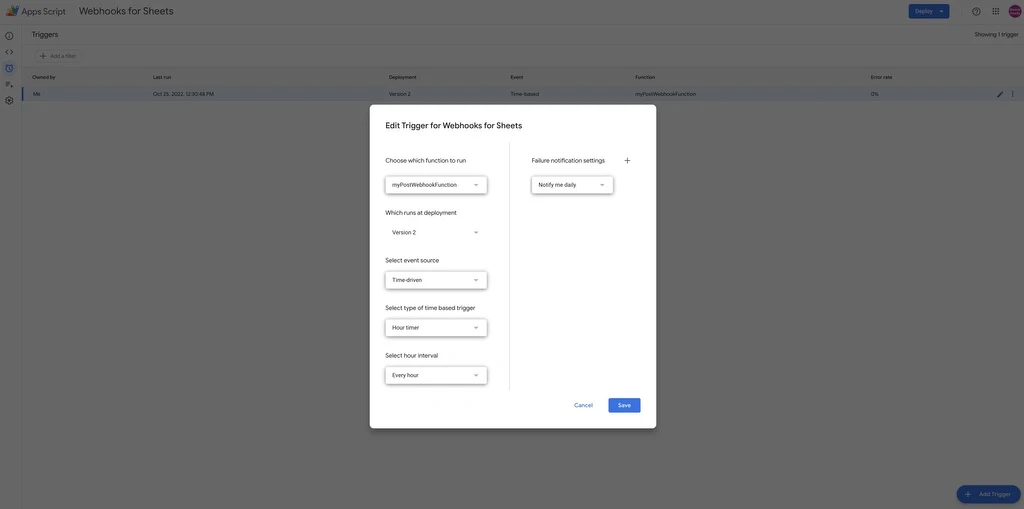
4. Now we have that script in place, we don’t want to have to run it manually every time. So go to Triggers (the clock symbol in the left-hand nav) and set your trigger up as per the screenshot.

This trigger sets the script to run automatically every hour. You can adjust the time period to daily or weekly if that suits you better, hourly is probably overkill.
Conclusion
So you are all set up with an automated process and it will be great to see how you use that data in your content workflow (so please leave comments below to let me know how you’re using it).
I’ll be posting some articles soon on how I’m using it.
If you’re already an Integromat/Make, Zapier, Pabbly etc. user then you can use any of those instead of the Webhook for Sheets Add-on to do this as well.
If you use Airtable instead of Google Sheets for your content workflow, then you’ll want to read How to Automatically Send Post & Page Data from WordPress to Airtable where I show you how to set up the same system but using Airtable.